A certain boy is having a birthday soon, and when I was reliably informed that the only thing he wanted was more Nerf guns and bullets (of which he has an abundance already) I set about seeking inspiration.
What's most likely to limit the capabilities of an intrepid Nerf-gunner?
Running out of ammunition!
I found a great tutorial on making an Ammunition Holster here, and then proceeded to adapt it to my resources.
I have a self-imposed rule that any of my crazy projects have to utilise fabric I already own. Because I have an awful lot sitting there waiting for those special creations!

I cut two strips, approx 44 in x 4 inches - to allow for a slightly bigger boy than the original,
this was also the width of the fabric - less cutting = less time.
(I only had an hour to get this done)

Using a rotary cutter - your best friend when you have limited time
I used two narrow pieces of fabric (instead of 1 wider strip) to make up for the lightweight fabric I wanted to use on the front.
I had some mad felt kind of thing that I thought would be stronger and grip well to our Nerf-gunner's clothes, making Nerf bullets all the more easy to access & reload.
The next problem to solve was the complete lack of Nerf darts in our house. Luckily a kind friend came to the rescue and loaned me some.
I have to confess I have a secret love of Nerf guns - how fun are they! I cannot wait until they are a part of the play-ware in our house. But I do realise that I will be forever picking up nerf bullets.
Or maybe I could come up with a cunning plan in which I take them ransom and kids have to pay to get them back?
Or maybe I could make my children Nerf Dart Holsters, and they'll always be put away ready for the next ambush? Who am I kidding!
Some elastic - approximately 1.5m.
I had to make another departure from the original tutorial.
My fabric was lightweight and wasn't going to maintain its shape against the elastic. I needed the stability of the backing as well. So I joined the two before I attached the elastic.
Before this, there was another key step.
Let me tell you how much I hate pinning* things. It's fiddly, it never seems to work well for me and it slows me down. I may also be Lazy**.
Before I attached the two strips I drew a line running along the length of the front strip. I have a fabulous tailors chalk mechanical pencil, which means you can mark accurately.


The line was at half of the height of the strip minus half the height of the elastic
2 in - 1/4 in = 1 3/4 in

This was so I could line up the lower edge of the elastic to keep it straight along the whole strip. Without pinning**.

I sewed the strips right sides together, trimmed corners (to remove bulk) and folded in the flaps at the open end.
2 in - 1/4 in = 1 3/4 in

This was so I could line up the lower edge of the elastic to keep it straight along the whole strip. Without pinning**.


I ironed them. Ironing makes everything better when you sew. I promise you. It is always worth it

Then I topstitched (sewing on the top) the opening closed and continued all the way around the strip. I think topstitching always makes things look better.


More measuring..
On the front of the outer fabric I attempted to use the Nerf bullets (loaned from a kind friend) to measure the size of the elastic loops. I really did try to pin*, as I knew there was a lot of potential for everything to go crooked, and end badly. When this didn't work, I used the 1 inch allowance from the tutorial. I marked the elastic at 1 inch intervals so I would know where to sew.

I anchored the end of the elastic (wrong side up, only a tail over the fabric strip, ie the main part hanging down away from the fabric).
 |
| Anchoring the elastic |
 |
| Flip elastic over, start sewing on the lines |
I attached the elastic at every inch, approx 6/8 of an inch along the fabric. I didn't measure, just created a bit of a bump with the elastic.

Once I had enough loops for the holster, I trimmed the remaining elastic off, tucked the end under, and secured with a triple stitch.

If I make one of these again, I'll do it differently. I'll mark the elastic (at 1 inch) and the fabric (at 6/8 inch). Then I sew do this in one continuous boxy zigzag, rotating the holster around as I sew. This would look better, be stronger, and also mean I didn't have to spend a good hour snipping the ends**. Luckily this was a pleasant way of passing the time at swimming lessons....
I joined the two ends of the holster, with a triple stitch (nice and strong).

Holster completed.
A matching ammunition satchel-belt was also made. I would have loved to explain it to you, but it was late, and I was tired, and running out of time... It has a belt clip for easy removal. Nerf-boy promptly declared it a Nerf-gun holster.
The birthday boy was pretty happy, and willingly modeled his new gear.
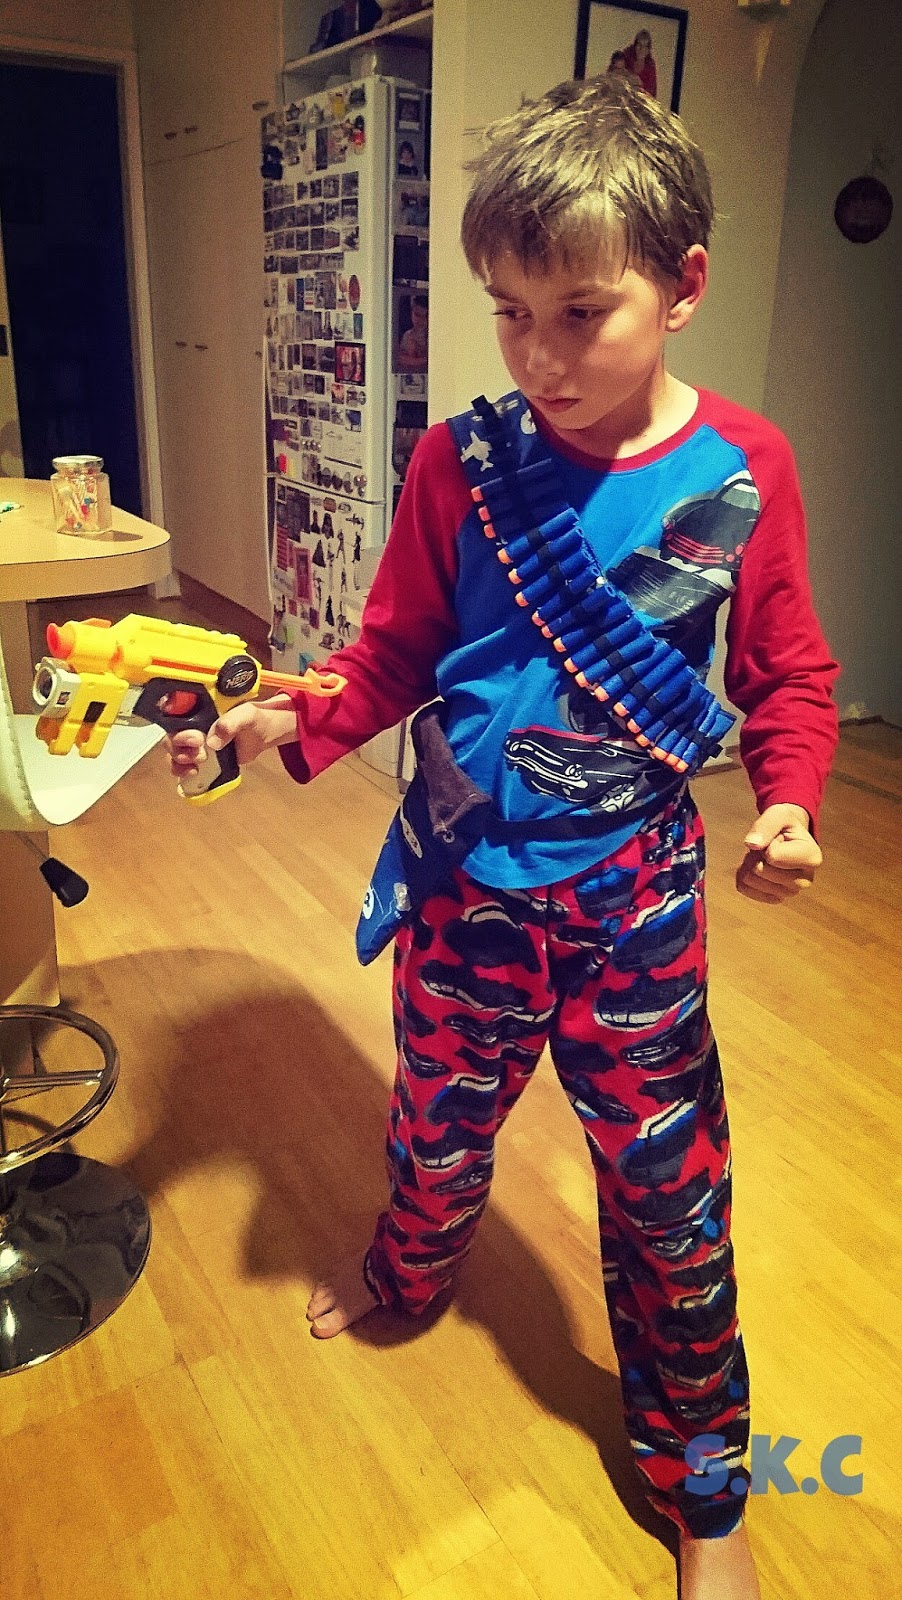
It brings me such joy when something I create for someone is going to be enjoyed by them (because I often have doubts that I'm going to hit the target - no pun intended).

-------------------------------------------------------------
*I usually avoid pinning things at all costs. It takes extra time, and that's just asking too much of me if I can possibly get away without it. I really did try for this project, knowing how hard it would be to keep the elastic straight, but it wasn't working. Hence the lines instead.
** In case you hadn't figured it out already this is not a blog for sewists*** . While I did use my mum's sewing machine as a kid, I never learned any of the correct ways to do things. I remember my pathetic attempts in textiles that were met with disdain by the teacher. It has taken me years to realise the voice in my head saying I shouldn't see things because I'm no good at it is a load of baloney. I'm not a technical sewist. I sew to make things people enjoy. Sometimes I've even designed them myself. And I've learned to work around my limitations (straight lines anyone?) or improve with the practice. I also take shortcuts wherever possible. Some may call this lazy.
 |
| The new Charlie's Angels? |
No comments:
Post a Comment